Wednesday, December 16, 2009


Some gal friends and I have joked, on more than one occasion, that we're going to organize a skirt hike--y'know, a dayhike where you don't necessarily have to be a girl to participate, but you do have to wear a skirt. (That second-to-last part added purely to encourage strapping lads with flowing manes and well-defined calf-muscles to don their boots and UtiliKilts and join us.)

Though I like the rugged functionality of the UtiliKilt, let's face it, on me, it just ain't flattering! I do not have the figure to pull off wickedly thick pleats and umpteen pockets without coming off looking like Frumptonia.

I found something a little more feminine in the Royal Robbins Discovery Skirt - a flattering mixture of functionality, durability, and ehh, maybe a little fashion, too. It's cute enough to wear to a job interview or out for a cocktail, yet rugged enough to emerge from a hike unscathed.

It's made of a slightly stretchy, moisture-wicking nylon-spandex blend that is figure-flattering without binding too tightly, and UPF rated up to 50. The inside of the wide, forgiving waistband is a breatheable mesh, and there's a back zipper for easy entry (though if you're not careful there, quickzip, it tends to bind). And with three pockets - a left hip pocket with snap closure, a right hip security pocket with vertical zipper, and a velcroed cargo pocket at the hemline- there's ample (and secure) room to store enough necessaries that you could conceivably leave your purse at home.

It's lightweight, it folds easily, and it's wrinkle-resistant, making it a versatile piece for your travel wardrobe.
The sizing seems to run a wee bit large though, maybe because of the stretch. I say reach for the ego boost and order down a size--And hurry up about it, so you can go on our skirt hike!
Grade: A

Wednesday, December 9, 2009

Are you gonna drink that?


I bought the Katadyn Hiker Pro water filter almost a year before I started backpacking. As the trip binges started (somewhere between 2-4 backpacking trips per month), I began to see a pattern. Almost everyone I went on trips with had this filter.

At an average price of about $70.00, it's not the cheapest piece of gear on the market, and also not the most amazing. While I myself have never had a problem with it, several friends on a ten day Yosemite trip managed to break two of these bad boys, though I have heard talk of "user error" playing a hand in that. (They also broke a steri-pen.) The fact remains, most of them still use a Hiker Pro. I myself have not yet managed to break one, despite my uncanny ability to break or damage almost anything, and I believe this counts for something...

I have filtered from rivers, streams, water pumps, a trickle on a rock or even a dirty puddle in a pinch (because when someone on the trip drinks half a box of wine and gets massively dehydrated halfway through the hike out, you will do most anything), and have always managed to come out with drinkable water. It works relatively quickly, and is relatively lightweight. I would say this warrants a recommendation. Though, at the advice of EB: Don't pump too hard. You might break the handle.

Notes on use: Keep the two tubes separate to avoid contamination. You don't want to defeat the purpose of using a water filter by using it incorrectly. Also, run some water through before pulling it in your water bottle/bladder each time you use it. (You will understand why when you do this.)

Grade (Taking into account the Yosemite stories): B-

Saturday, November 28, 2009

good, not great, entry into the world of trekking poles


I never learned to hike and backpack with trekking poles, so when my fiancé insisted I start using them I fought him pretty hard on it. Anybody who has ever seen me walk on level ground will understand why he made such a recommendation: I'm downright dangerous, especially when I'm in a hurry! I admittedly do better on uneven, rocky terrain, but the klutzy tendencies still hold pretty strong. Face plants, we go way back.

That said, I was loathe to spend any money on my entrée into Trekking Poles Land because I was sure I'd hate the whole shooting match. (And, to start, I did.) So, I picked up my first trekking poles at Target from their illustrious Eddie Bauer section. They were cheap, and that was pretty much my only requirement.

Fast forward some time later, and I'm still using them. They've survived being shipped across the country for our Yosemite trip (no snapping in half!); more importantly, they've withstood many, many, many trips, plunges, slides, and spectacular falls all over the country (because sometimes even a trekking pole can't save you). Only recently have I noticed my heavier-than-average usage starting to take its toll. Overall, they've held up beautifully. Much more beautifully than their price would imply. Additionally, I like their handles and the way they easily rock in my hands.

Some will consider these heavy, and I'm sure there are other entry-level trekking poles on the market set at a reasonable price. Still, for an entry trekking pole they are a-ok by me. I'm about to make a serious upgrade, but will certainly hang on to these as my backups. If you are curious about using trekking poles, but don't want to invest big money, take a look at these. When you're ready to upgrade, you'll have the motion down and can start to get more technical with your specs.

Wednesday, November 18, 2009

A quick, easy fix... (And cheap!)


I hate being cold, but I love winter backpacking. How does one reconcile these two things? Gear!

Having already spoken of the miracles of the Capilene 3 Baselayer, sleeping in a coffin tent, etc., I will now switch gears and tell you about my non-essential, supplemental, juuuuuuuust-in-case method of ensuring my feet don't turn into little blocks of ice while I am snuggled up in my mummy bag on a 15 degree night in the mountains - the Mylar Blanket.

Our #1 fan/naysayer might reply with a comment about how these "blankets" (it's more like a piece of plastic with a shiny side) are not the best option, they cause a buildup of moisture, etc. This is correct. It's definitely something that can happen, though I haven't considered it bad enough to stop me... Don't get me wrong, this is no substitute for appropriate winter gear!

The mylar blanket, known most often as a "safety blanket" or "emergency blanket", or, for the nerds out there, "space blanket", is given out for free at the finish of most half marathons and marathons, or can be purchased at Walmart or Target for a whopping $1.00. It weighs almost nothing, so I say, "Why not?" I usually bring one or two of these on a trip "just in case", and I would never know it was there...

Its use? When you are curled up in your mummy bag in your coffin tent in your Capilene 3's, and your feet are still cold and your teeth are still chattering... Throw one or two of these bad boys over the sleeping bag, reflective side facing your cold body. This lightweight, free to one dollar, "blanket" will reflect your heat back on you, and the blocks of ice on the ends of your legs will thaw nicely...

So, as I repeat my disclaimer that this is no substitute for appropriate winter gear, I will also repeat my sentiment, "Why not?" This may just be something you carry that adds virtually no weight to your bag, or it might be something that you consider a life saver on that cold night when your feet just can't seem to get warm. Would you rather take the chance?

Friday, November 13, 2009

another funky name for ya


I'm not a big fan of most sports drinks, as their sugar content often far outweighs any benefits they may hold for the average person—often, too, they have ingredients that just scare me with their names. The same holds true for any of those packets you can buy in the grocery store (Lipton, Crystal Light, etc.)...if you skip the sugar, you pick up a nice helping of aspartame or other scary artificial sweeteners (Acesulfame anyone?).

But lets face it: it can get boring just drinking water on the trail, day in and day out. When we stumbled across Nuun in a climbing store in Seattle, we thought we'd try it (especially after reassurance from my friend and the clerk).

I give it a mostly thumbs up:

The taste is pretty great for a portable tab you dump into your water bottle. They have a wide range of flavours, including banana and kona cola. I like the berry flavour, but a friend of mine hated that one enough to mail it to me (thanks M ;)

The portability is pretty awesome, too. Nuun comes in tabs in a plastic tube, so you aren't left with little packets when you use one. The tube is not large, and easy to throw in the side pocket of cargo shorts (or an outer pocket on your pack, or your bike bag, or whatever).

Nuun tabs contain electrolytes (salt), potassium, and calcium. The calcium is an added bonus over others, and something both men and women should be paying attention to. (Go Nuun!) They do not contain sugar, for those folks who need to watch that kind of thing.

Which brings me to the sugar: these guys are low-cal, which is great. But they do use sorbitol, which is apparently "naturally occurring in stone fruits" but is made artificially for food. Sorbitol is very safe and as far as I'm reading not a carcinogen; still, it's artificial. For a great comparison of the artificial sweeteners, refer to this chart. Note: sorbitol can, in very large quantities, cause *ahem* lower digestive distress; Nuun tabs don't have enough to cause problems—unless you ate several tubes at once, I'm assuming. Then you're on your own for being a weirdo.

They have something else called polyethylene glycol which adds experience (a richer feeling in your mouth), not nutrition. For the purists out there, you don't want to jump on that one and probably want to stick with water. I really dislike that they added this when it's so unnecessary.

So, negative points for the artificial stuff. Still, a good choice for mixing it up with the water. Bonus points for adding calcium.

Grade: A-

Tuesday, November 10, 2009

Bugaboo... Goofy name, awesome cookset


I got my Bugaboo cookset for Christmas a couple of years ago from my parents, per my request. I hadn't done a lot of research, but felt in my gut that this one would be a good choice. It's turned out to be a great choice.

As you see above, it has five main components: two pans, two pots, and one handle. All of the pots and pans have a nonstick surface.

I have taken my set backpacking and car camping, and it's performed well for both. Bugaboo is much larger than your typical backpacking cookset, but I'm ok with that. When we are packing for space and need the extra few ounces, we simply take our other fancy backpacking set (which I'll review later). Total weight is 1lb 7oz, so it's not designed to appeal to the UltraLight folks out there anyway. Occasionally I leave the larger pan and pot at home to conserve space, but really they fit nicely together thanks to their "nesting" design so that gets to be nitpicky.

The main advantage of the size is the cooking area: we've made pizza, quesadillas, and bacon on the trail with relative ease. (Just remember a tupperware for the bacon grease!) We also tend to eat a lot, and the pot accommodates a hearty meal for two ravenous eaters.

The other advantage for the size: I am able to fit my stove, a small can of fuel, lighter, matches, small spoons & cooking utensils, and a small towel inside the smaller pan/pot combination. This makes it so easy to know exactly where all of my cooking "stuff" is when it's dark, I'm tired, and we're scrambling to get set up and eat.

The cleanup is easy with the nonstick surface, and there has been little need to carry oil/spray/whatever to cook with because I've taken good care of the surface. When it starts to deteriorate I'll replace it (I'm not interested in eating teflon, thanks). As the manufacturer notes: Non-stick cookware should be used with heat-proof nylon or silicone utensils to prevent damage to the non-stick surface. In other words, don't grab your metal fork to cook with (just like at home)!

The main disadvantage with Bugaboo is my unwillingness to throw it on a fire as I would with an aluminum cookset. However, I bring heavy duty foil when I anticipate cooking on the fire and don't bother with my pans. The only other issue I've noticed is really a matter of user error: occasionally I screw up with the handle and drop things. Not fun.

Overall, I give this set an A. I've been quite pleased, and perhaps more importantly we've been the envy of many on the trail with the amazing food we've been able to whip up on the trail. Bonus points for being relatively inexpensive and widely available.

Wednesday, November 4, 2009

One Size Doesn't Fit All, But We're Working On It!


It's hard to be outdoorsy in an electronics age. Heck, it's hard to live in an electronics age, period, where you have a gadget for everything, and a different battery and charger and memory card for every gadget. It's an exhausting, expensive, and dare I say... cluttered existence.

And if you want to carry all that crap with you when you go somewhere? Forget it. Thank goodness today's designers are making electronics more universal - one device, multiple functions, yay! (Bless you, Blackberry and pals.)

I can't tell you how happy I am to finally have a phone with email and media and a really great camera function. There was a time capturing a breathtaking view I'd spent hours hiking to was worth hauling the weight of my best SLR up the trail, but no more. Since I got a phone with a decent camera feature, most of the time my heavy SLR - heck, even my pocket-sized Canon - stays at home.

My phone is lighter, and has significantly better battery life. And let's face it, I'm carrying it with me already.

Surprisingly, I'm more than happy with the quality of the the photos produced by my 2-megapixel phone. I just haven't been happy with the lengths I've had to go to to get them off my phone. Bluetoothing them over one-by-one is a pain-in-the-neck, and MMS/email isn't really an option for me, based on my data plan and the snap-happy way I approach creating a visual record of an event.

Which brings me to my latest, neatest purchase. (You knew I'd ramble there eventually.)

I bought a Duracell Micro SD Universal Bundle. For less than fifteen bucks, I got a 2GB Micro SD card I can insert in my phone, greatly expanding storage space for photos, mp3s, etc., plus three adapters: Mini SD, full-sized SD and USB. It also came with a hard plastic clamshell case just big enough to hold all three adaptors, which I've found to be suprisingly resilient, sturdy, and water-resistent. (Don't ask how I know this - I'm rough on sensitive electronic equipment.)

Moving photos now is a breeze! I just eject my Mini and slide it into whatever adaptor best suits my needs, and use the adaptor as I would a regular version of that size card. So far, I've found the USB adaptor to be the most versatile, enabling me easily connect to my PC, my laptop, my printer, and just about any photo kiosk in retaildom.

Recently, I ran out of space on the full-sized card in my good camera while at my sister's wedding. I ejected my Mini SD from my phone, plugged it into the full-sized adapter, and voila, it got me through the reception.

Fifteen bucks was a small price to pay to achieve a sort of harmony between all my gadgets and necessaries.

Now, if I could just get a universal car charger for my phone, my iPod, and my GPS...

Monday, October 26, 2009

smart to wear


Reader Chris mentioned this in a post reply, and I thought it important enough to call out in a review. What you see pictured is the Road ID.

It's a pretty simple concept, really: print some basic information on a wristband and wear it when you're out running, cycling, whatever.

My father bought one for me when I was riding a lot, and I've since added it to my running repertoire. There are a few reasons I prefer this over some crap scribbled on a piece of paper and shoved in my pocket:
  • It doubles as a light reflector. You can see for yourself in the testimonials that this simple attribute has saved lives: when a car's lights hit the reflective material, you are more visible than you were when you weren't wearing it. You may have other reflective material on other parts of you, but if that angle doesn't hit quite right you may not be visible enough.
  • It is waterproof and easy to quickly put on. That scribbled note may get wet, you may not feel like writing stuff down, you may even forget to grab your id/insurance card/whatever in your haste to get on the road (if you're like me, anyway). 
  • It is easily visible to paramedics or anyone else who may need to access that information. Admit it, you never think you're going to fall or have issues. You prepare pretty well, but you figure you won't fall on most (or any) of your outings. My father cycles quite a bit, and on one of his solo outings a couple of years ago he fell and blacked out—the folks who saw him fall were able to quickly call my mother and find out who he is without digging in his bag or pockets.
It really, truly is a cost-effective safety measure with several options for style, color, etc. If you don't want to wear it around your wrist, get it for your shoe or wear it dog-tag style. I especially like that it's not married to a particular pair of running shoes or glued to my bike.

I really recommend you nab one of these and make it a permanent part of your fitness/activity wardrobe. It just makes sense.

Friday, October 23, 2009

the quest for perfect trail coffee


After our Java Juice review, Reader Cristy recommended we try the new Starbucks Via (which, coincidentally, came out the same day as the Blech review).

I have to say, it's pretty awesome stuff. I took the in-store taste-test, and could only distinguish it from the in-store "regular" brew (Pike Place) by looking closely at it and figuring instant coffee would look less...smooth (as it's coming from powder)(I was right). I tried the Colombia variety, though there is also a darker Italian Roast variety available.

I thought I'd perform my own home step-by-step comparison to a store brand of Instant Coffee singles (in this case, Kroger) as that is something that would likely end up in our packs for a backpacking trip. You can see the initial packaging side by side at the top of this post.


There are immediately advantages for the Via. I have been carrying that 3-pack around in my purse for weeks now, and have barely noticed it. The post-consumer package waste is also minimized as you are only left with the small "tube" as opposed to the exterior gold plastic wrap in addition to the tea bag-style remnant.

Then there's the taste. As you can see, the color is strikingly different.


I brewed each cup for the recommended amount of time, so I was not "shortchanging" the Kroger coffee. I didn't even have to taste them to know how they'd differ in my mouth, but WOW the difference. If you happen to like the brewed taste of Starbucks coffee, you'll LOVE Via. It's rich, flavourful, and does NOT taste like any other instant coffee I've had. That's even before creamer. Denise had to try it cold last weekend, and gave it a thumbs up as well.

The disadvantage for the Via is that each of those precious tubes is $1 (it's about $3 for the 3-pack), vs. significantly less for the Kroger baggie. And, the "medium" is really pretty dark, so I'd almost hate to see the Italian Roast.

Still, I have to hand it to Starbucks. The Via is definitely a WIN.

Thursday, October 22, 2009

Marathon Morning Checklist - Part Two - For Those Who Travel Light


Contrary to my well-prepared friend, on marathon day, I run light... However, there are still some essential items I would not leave at home...

1. Body Glide... I made the #1 mistake runner's can make on the day of my first marathon - I wore something new... due to a last minute issue with my running shorts, I was left to buy a new pair, and it didn't go well. The chafing on my legs was so terrible I had scars for 3 months, despite stopping at every first aid stand on the entire route for Vaseline. This was the single worst aspect of my first marathon. I now apply Body Glide before any run of 10+ miles, and carry the smallest size they sell, which about 1-1.5" inches in length, for any run of 15+ miles.

2. My Gizmo pirate running socks... Available at every race expo I have ever attended, these socks are specially made for running and also make me feel like a bit of a badass. These socks are moisture-wicking coolmax, though not as technical as Dusty's socks, because I don't have extensive problems with blistering when I run (this has been primarily a hiking-related issue for me)... However, absolutely, under no circumstances do I recommend running any distance over 7 - 10 miles in cotton socks. I did that once and regretted it for a week. My feet were torn to shreds.

3. The sports bra/shelf bra tank combination, both in wicking fabrics. This is less specific in brand, but its benefit is twofold. First off, I need two bras to run 10 feet. Otherwise, it just hurts. I fail to see how any female who is a C cup or higher can run without two bras. Second, the space in between the sports bra and the shelf bra provides a nifty pocket where I can store gels, body glide, keys, Advil and mini camera. My brand recommendation for both bra and tank is Champion C9, which can be purchased at Target. I recommend purchasing them tight for best results, particularly if you have more to hold in...

4. Advil. Advil and more Advil. I carry about 10 of these little orange life-savers in a little plastic baggie for any marathon or long run. I also take 2 before I start. Because long distance running hurts.

5. Snacks! Even if your body does not normally require a refueling every three to four hours, like mine, it will require at least a few snacks during a long run or marathon. While a race course will always provide plenty of water and generally 1-4 snacks, I still carry extra just in case. Jelly Belly Sports Beans, Power Bar Gel, Clif Shot Blocks and Gu are some of my main choices. I will carry one or two on a race (because some are provided), and up to four or five on a long run, depending on the distance. I also bring at least one packet of electrolyte mix which can be added to water if you feel drained or dehydrated.

6. A mini camera. Purchased at CVS for $10.00, my mini digital camera (while the link is the exact camera I have, ignore the price on the link and go to CVS) is small enough to carry in my special "pocket", and I don't care if I break it, because, hey, it's a $10.00 camera... I have carried this camera on two past races and been satisfied with the results. Though the pictures are not of the most amazing quality, they far exceeded my expectations for the price and size of the camera...

I leave my water and Ipod at home for a race (which would never happen on a long run), because I get my energy from crowd support and there are water stands every 1-2 miles in most races.

Basically, first time marathoners, you don't need an arsenal, but it does not hurt to be prepared. Your longer runs will give you an idea of what you need, and you can check the information about what is offered on the course to figure out what you need to carry and what is already provided... Knowing what you need, and making sure you have it, can make that 13.1 or 26.2 feel like a jog in the park... A long, long, long jog in the park...

Tuesday, October 20, 2009

Marathon Morning Checklist, Part One: The Boy Scout

So, um, I’m not a minimalist. Laugh if you must, but in honor of the Marine Corps Marathon, which Denise and I will be rockin’ on Sunday (send us good vibes!) we thought we’d do a sort of comparison of our running styles – and by styles I don’t mean pronation.

Unlike Denise, who will post her own take on this very shortly, after much trial and error, I have adopted the ‘always prepared’ Boy Scout approach: I'm now of the opinion if you even think you might need it, carry it with you. Better to have it and not need it than need it and not have it.* (Monster-blisters on three continents’ll do that to you.)

Without further ado, from head to toe:
  1. Nike Dri-Fit Featherlight cap – It’s lightweight, machine washable with a plastic shape-retaining brim, and the underside of the brim is black, significantly cutting down on glare.
  2. Polarized sunglasses – I like to pretend I need them to shield my eyes from the gnarly windspeed I’m creating, but really it’s just because I’m a vampire who is hyper-sensitive to the glare of the sun.
  3. iPod – I don’t care what the race officials say. That’s right, I’m a rebel.
  4. Garmin Forerunner and chest strap – Never mind that I like knowing how exactly fast I’m running and how fast my heart’s racing, what I really want to know is how many calories I’ve burned, so I know exactly how many I can pile back on at my post-race feast.
  5. Nip Guards and Body Glide on all my chafe-y spots
  6. Fuelbelt – When I’m in my winter gear and I strap this puppy on, I confess, I do sort of feel like a superhero, albeit a superhero weighted down with: 2- 8 oz. bottles of water, 2 - 8 oz. bottles of Accelerade (grapefruit flavor, how I miss you!), a phone for encouraging where-the-hell-are-you texts from my peeps at the finish line, ID/Insurance Card/Keys tucked securely in a zippered pocket, an assortment of gels, and spare socks in a ziploc bag to keep me from sweating on them before I'm ready to
  7. Old school nylon fannypack – Stylish or not, it’s still functional as hell. Just enough space for what I need it for, which includes: Tiny baggies of Advil and electrolyte capsules, 3M MediPore tape, collapsible scissors, sterile lancets for blister-draining on the go, alcohol preps to dry out my sweaty feet before applying adhesive bandages, and blister packs of tincture of benzoin to help said adhesive bandaging stick
  8. Drymax Maximum Protection running socks – slipped on over feet that have been pre-taped and Body Glided in an elaborate blister-prevention ritual that would meet the approval of any practicing Voodoo priestess
  9. GymBoss Vibrating Interval Timer – My newest gadget, with which, judging by my recent successful training runs, I hope to run-walk my way to my best time ever by at least an hour. (Hey, if regular walk-breaks will do that for my time, I will feel no shame!)

    Please join us again very soon when Denise will pose the question, ‘So, D, are you running this marathon, or are you going backpacking?’

    *Rest assured, if it’s on this list, at some point I’ve needed it and not had it.

Thursday, October 15, 2009

So what do you wear UNDER the cute hiking pants???


Deep down, even us outdoorsy women, who rub mud on our cheeks in caves like it's war paint, occasionally want to feel like that delicate sweet ideal girl who never sweats and whose farts smell like roses... It's pretty much not going to happen on a 20 mile long run or an 11 hour hike in the mountains, so we settle for things like the right underwear and socks.

I had been coveting Patagonia boy shorts for months, maybe years, but could not bring myself to spend $25.00 per pair for underwear. Finally, the big Patagonia sale about two months ago lowered the price to $8.00 per pair, about $12.00 per pair with shipping when I bought two. I take it all back, I would pay the $25.00!

What makes these so wonderful as to make them worth so much, you ask? Well, I'm sure you know what the wrong underwear when working out can feel like... Cotton gets wet and stays wet, leading to chafing and just general unpleasantness. Other synthetic fabrics might dry quickly but smell bad. The Patagonia boy shorts are juuuuuust right. The material is soft and comfortable, and it dries quickly, which is useful both during wear and when you are washing them in the sink of an Alpine hut on a six day hiking trip where the drying rooms sometimes work and sometimes do not.

What else makes these wonderful for such a trip, you ask? Well, when you are sharing rooms in bunkhouses with 6 of your closest friends (who hail from both genders), modesty tends to be thrown to the wayside. As someone who generally does not like to let it all hang out in front of others, the level of coverage provided by boy shorts is a big bonus for me in a group setting. Far more territory is covered in boy shorts and a good sports bra than the average bathing suit, so I did not have to squiggle around in my sleeping bag every time I wanted to change my pants!

They have also passed the comfort test on a 20 mile long run. This is no small feat, as there is very little comfort to be found in any run over 15 miles...

And, the final bonus? They look nice! The colors and designs are cute and feminine. This is definitely one case where I say to go ahead and spend the money. Whether backpacking, running a marathon or just lounging around, you can definitely get your $25.00 worth on a pair of these...

Grade: A+

Friday, October 9, 2009

A Miracle Happened!

Last weekend, during the last of my twenty-mile runs in preparation for the Marine Corps Marathon, I ran twenty-one miles—are you ready for this?—blister free! That’s right, people, blister free!

Never before in my life have I run that kind of distance without experiencing some sort of major foot discomfort (i.e., run myself lame) and I credit it to the following things:

First, I was running on nice, even terrain on a cool, fall morning.

Second, I remembered to pre-tape and lubricate my problem spots.

And third, I got new socks.


As our other blister-prone contributor will attest, those who suffer the curse are almost always trying out one new sock or other. Myself, I’ve run the gamut: Wrightsocks, Thorlos, REI brands, etc. None have lived up to their claims, and all have left me feeling fleeced and better off in my el cheapo rotten cotton.

Until now.

Drymax, how I love thee!

On a whim, and in a fit of desperation, I bought a pair of Drymax Maximum Protection Running v4 socks from ZombieRunner.com, a website devoted to all things ultrarunning. I figured if anybody knew anything about running blisters it’d be a bunch of crazy ultrarunners. And it didn't hurt that Runner's World Magazine rated them best blister-prevention sock in a recent poll in its May 2009 issue.

From the first moment I put them on and slipped them into my shoes, I had high hopes for these socks; it felt like I was walking on clouds. They fit slightly snugger than the Thorlos and Wrightsocks I was used to and seemed to be made of a greater percentage of synthetic fibers.

Under close observation, Drymax seems to have taken the best features from Thorlo, Wrightsock, Balega, and other brands and combined them into something undoubtedly more effective. Like Wrightsock, they have moisture-wicking dual layers; like Thorlo, they have extra padding in the footpads. Like Balega, the tops of the socks are a lighter, breatheable mesh.

The padding distinguishes itself from Thorlo, however, in that is coarser and a bit more nubby, with more space between the fibers – which actually seems to work better at wicking moisture away from the feet instead of simply absorbing it.


Usually, I change my socks at mile ten of a twenty-miler, but last Sunday I didn’t. I kept on the Drymax to see how my feet’d fare, and they worked beautifully in conjunction with my taping. I was still smiling at the end of my run, and not limping in the slightest – despite wearing the same shoes that shredded my feet two weeks before.

Really, I wouldn’t change a thing about the socks, except maybe the price. It traumatized me to pay $23.95 for a pair of socks. But given that they live up their claims, I can see myself spending another $23.95 in the very near future, maybe more – especially since they make hiking socks, too. But that’s a whole ‘nother blog.

Grade: A+

Monday, October 5, 2009

Don't spend $20+ on a pack towel. Seriously, just don't.


I have a love-hate relationship with REI. They have everything I will ever need, their sales staff is helpful, courteous and knowledgeable, and they give me all kinds of advantages for being a member, including their dividends, the world's best return policy and member only discounts and sales. Sometimes, though, they just sell overpriced crap. I guess it's the same with many stores, but there are some things I just would not buy at REI.

One example: the camp towel. A friend of mine went to REI a few weeks before a long backpacking trip seeking a camp towel. The cheapest one in store was around $20.00, and the size of a small dish towel. Apparently the micro-fiber is supposed to make this a worthy purchase. It doesn't. He borrowed towels for the entire trip and plans to make the most of the return policy. My other friends are happy with their towels, but still paid $25-30 and greater to purchase them. Not me!

On a whim, while purchasing my cheaper, less essential backpacking gear about 3 years ago, I picked up a Coghlans Camp Towel for $3.00 at Dick's Sporting Goods. This towel is 12 x 30 and the "deluxe" version is 14 x 40 for about $7.00-8.00.

I have used this (extremely lightweight) towel for 3 years, and it is no worse for the wear despite its price implying that it might be somewhat disposible. Its claim that it absorbs ten times its weight in water is completely believable to me (though I have not engaged in any testing that would prove this with scientific certainty). I never would have believed, based on its size, that it would be enough towel to dry my body and hair after a shower, until I was in the situation where it was the only thing I had. While you can't wrap this towel around your body or long hair, it will dry you thoroughly. An added, and very important bonus, is that the towel itself dries significantly faster than the $30.00 microfiber towels my friends were sporting on the same trip. Yessir, mine dried, theirs didn't. $3.00. Take that, expensive outdoor gear sellers!

Grade: A-, for lack of modesty. I am guessing a larger sized version would be A+.

Friday, October 2, 2009

Guest Review: My First Vertical Gear

As noted before, we will occasionally feature guest reviews by trusted friends and colleagues. Today's review comes from Cristy F.: architect, AOC member, and outdoorswoman extraordinaire.


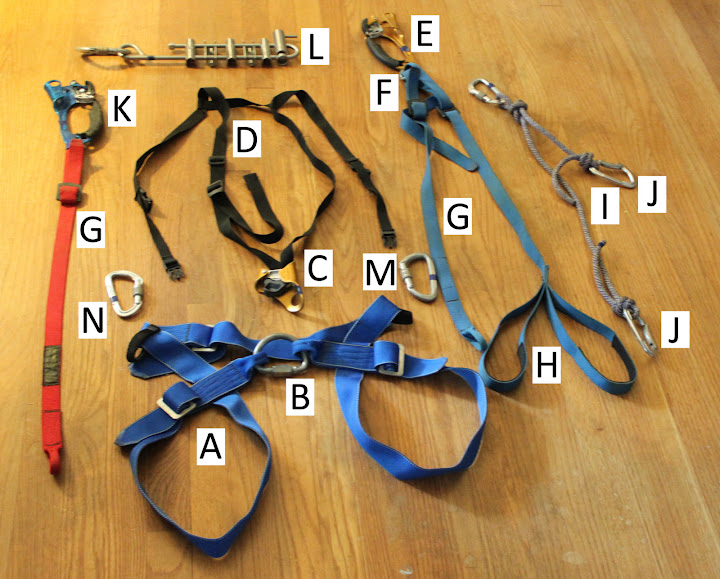
Vertical Caving Essentials: Seat harness (A), 1/2 Moon Galvanized Carabiner (B), Croll (C), Chest Harness (D), Left Ascender (E), 7mm Oval Carabiner (F), 2 Safety Straps (G), Foot Loop (H), Double Cowstail (I), 2 Non-locking carabiners (J), Right Ascender (K), Stainless Steel 5 bar with Hyper Bar Rappel Rack (L), Screwgate Carabiners (M,N), Gloves (not pictured) and Webbing (not pictured).

Vertical caving is a specialized sport that should not be embarked upon without proper training and guidance. Please keep that in mind before dashing across the internet for awesome gear, and seek professional help before going vertical.

Vertical Gear. Once you decide to buy it, you can't wait to get on rope. However, every caver has a different opinion on what style of gear to choose, where to buy it, and once you get it, how to assemble it.

I decided to go with the "Frogging" style of gear. Frogging gear is best for shorter, beginner climbs, and in general for climbs that are gnarly and dirty (the way I like them). It also gives the beginner a chance to get used to being on rope with a system that is simple to safety check.

I am happy with my gear. I purchased everything from Gonzo Guano Gear and I feel I got the best combination of value for money. You can also purchase very reliable gear from the nice people at Inner Mountain Outfitters, and if you're in the Atlanta area or meet up with them at the Cave-In you'll have the added advantage of trying everything on before you buy it.

Much of the gear is standard component and falls in the category of "If It's Safe, It's Good". I should have purchased additional 7mm Oval Carabiners for all my strap to ascender connections. Opinions mainly vary on four items: the chest harness (go for the H type), the foot loops (with the double you can use both one foot or two), the seat harness, and the rappel rack.

I purchased the Gonzo Guano Gear (GGG) Caver Seat Harness and have sat in it for a few trips. It is not a maserati harness! It is the simplest harness you can buy assembled and ready to go. I have learned to have clothing between my upper waist and my harness to avoid little rub/cuts on the sides of my stomach. Smaller people have problems with the leg loops falling down. Men have issues with the leg loops and what is between their legs. At this point I am not a pit bouncer, spending all day on rope. I like to drop the pit and explore the cave so the slightly lower comfort level is not a problem. If I start spending days at a time on rope I will spring for a cushier harness, but at this point I am happy with my simple, cost effective, safe harness (B- on this one).

On the other hand, the SMC Stainless Steel 5 bar rack with BMS Hyper Bar is one of my favorite pieces of gear. It looks rather odd and is all metal and clanky so you feel like you are about to do something fun when you pick it up. Whenever it is attached to my harness I know an adrenaline rush is on its way, and I know that my life depends on it. Many people recommended mini-racks and others asked why I wanted 5 bars and a hyperbar. This rappel rack is special. It is a solid piece of safety equipment; I can lock myself off so completely that nothing could budge me, which makes me happy. Since it is friction-friendly stainless steel and not aluminum it is an appropriate rack for the long rope drops of the future while still being perfectly acceptable for short ones. People might laugh at you, but insist upon it, 5 bars AND a hyperbar, in Stainless Steel. Some assembly is required (A++).

Overall I give the whole gear package an A!

Thursday, October 1, 2009

The hiking sock experiment...

My previous blogs have given you some idea of my past blister experiences, if you are a regular reader. If not, read me. An unfortunate fact about my favorite socks is that they no longer make them in my size. What's a girl to do?

I got my perfect setting for a hiking sock experiment in what was also a potential blister disaster: a 6 day hiking trip in the German and Austrian Alps, where our typical hiking day ranged from 6 to 11 hours and the terrain was...well, Alps! There were some feet on that trip that were not for the faint of heart, but not mine, thanks to the strict regimen of very tight socks and slightly tight boots I have followed ever since my nightmarish experience on Cumberland Island in 2008, where every step I took was like walking on razorblades.

A week before the trip I went to the mothership to purchase my socks (a lot of the smaller stores we shop at don't carry children's sizes, which is pretty much where you have to go if you want to wear tight socks on a size 6.5-7.0 woman's foot - I typically go with a children's medium, but I suggest trying them on). I bought three different socks to test in addition to those I already own and like, all of which have corresponding socks in the adult section for those with bigger feet. Two of the three get a thumbs up, I am happy to report!

For days 1 and 2, I went with the Wigwam Hiking/Outdoor Pro Socks. The cost is $9.50 per pair for kids, $12.00 for adults. We hiked for about 5 hours the first day, very much of which was uphill, and 6-7 hours the second day. Both days I did not experience a lot of wetness in my socks, and, more importantly, both days I went completely blister-free! Grade: A.

For day 4, the "long" day (which it certainly was), I went with Smart Wool Hiking Socks, as they are the most expensive which in some circles means the best. These socks are $10.95 for kids, and cost a good bit more in the adult version - $17.95. They stood up to the blister test, I must admit, which is impressive for the length and difficulty of the hike on this day. We even hiked in the rain for two hours, adding an extra degree of challenge. However, though I did not experience significant foot wetness (prior to the rain), it was more than the Wigwams. A- (docking points for price)

On day 6, the easiest day of the trip, I wore my REI Merino Wool Hiking Socks. At $8.00 a pair for kids and $12.50 for adults, it is a more economical option than some brands, and they were also on sale that day. I decided to buy one pair and give them one last chance, cautiously, and only picking the thickest pair in the bunch. I have learned from this experience that I still hate REI socks. I wear them at camp but I will not hike in them. I may have been on the trail 20 minutes before my feet felt wet from sweat. I had a tiny blister on my toe at the end of this day. C-

The winner: Wigwam! While these socks were not substantially better than the SmartWool, they were substantially cheaper, particularly in the adult version, where the markup is astounding on the SmartWool. Truthfully, I would buy either on sale. The real lesson to be learned is one I have repeated over time, which is not to go "store brand" on the socks. They are just too important to your comfort as a hiker.

Tuesday, September 29, 2009

BLECH!!!


I'm not one to post many reviews of stuff I DON'T like, but in the interest of saving people from certain distress I feel I must post this.

My fiancé is quite the coffee addict, springing for a cup first thing in the morning every day he can manage to get it. I go in cycles of addiction to caffeine, where I am hooked for awhile then I break the habit in favour of things like peppermint tea and lemon water...then I'm right back on the crack again.

Needless to say, we've done a little experimentation in the field when it comes to feeding the addiction.

J has used Java Juice for a few trips now, and likes to say he's a fan. He adds cold water and sucks it down like it's any regular cup of coffee. I ran out of my (preferred) PG Tips on a recent trip of ours, so I thought I'd try this "magic" stuff.

HOLY MOLY. I couldn't do it. I could not even fake it in the name of addiction. I know I've had more bitter liquids in my mouth, but the only thing springing to mind is a bitter liqueur I once tried in San Francisco…and I will still say the Fernet tasted better.

For the record, I tried the "French Vanilla" flavoured juice, and did not have the luxury of creamer. Maybe if I dosed it with a lot of milk product it would begin to taste more palatable to me? Not sure I'm willing to try…Folgers makes some instant coffee singles that I've heard are pretty good. In the meantime, I'll better plan my tea rations!

Please note: I do like coffee, just not this stuff!

Wednesday, September 23, 2009

hello, autumn!


We're now officially into Fall, which puts us into my favourite time of year to be backpacking. There's something so magical about the amalgam of colours, temperature and smells of this time of year; I can't wait to get out there on the trail.

There are many pieces of gear you will find yourself with on any trek, but most will agree there are some basics you don't really want to go without. My sleeping bag is definitely one of those basics. I'll go tent-less before I'll go bag-less, for sure!

That said, I love my Big Agnes Crater bag and pad system. They don't appear to be *making* this particular bag anymore, so this is a more general review of the bag and its sleeping pad system; as you see I've linked to the google shopping options (outlet and others seem to still have it).

The Crater is a 15 degree, down-filled mummy bag—I've found that for most cases 15 is perfect in the Southeast. When it's hot outside, I simply leave it unzipped. When it's cold, I cinch it tight and happily roast the night away; I haven't found any drafts or leaky spots after a year of using it. When I'm traveling with my fiancé, we zip our bags together and I leech off of his heat. This bag is a win-win on the temperature for me.

As far as the pad is concerned, the Big Agnes is different from all of the other sleep systems I've owned. Namely, it doesn't have a bottom! You must purchase a separate pad that you inflate then slide into the underside sleeve of the bag. I've heard this isn't quite the best for *super* cold conditions, but I've yet to find myself winter mountaineering. (When I do, I'll consider my options.)

The pros for this bag and sleeping pad system are simple:
  • You save on weight in the pad by having an inflatable pad.

  • The inflatable pad is way more comfortable, to me, than my other sleeping pads.

  • You save on weight in the bag by basically having half a bag (the upper portion).

  • You potentially save on space with the option to keep the pad inside your bag when you pack it up for the day, plus bag and pad compress nicely.

  • Best of all, you don't roll off of your pad in the middle of the night!


The cons:
  • When I've been hiking all day, sometimes I really, really don't feel like blowing up my sleeping pad.

  • You can't get too close to the fire. Not that I make a habit of sleeping close to fires, but some folks take these pads and insert them into fancy contraptions to make chairs out of them. Pop! goes a little piece of spark and pop! goes your sleeping pad.

  • See aforementioned cold weather conditions (sleeping on snow) that I've heard about but not experienced with this bag/pad.

There are other sleep systems I look forward to trying, but for now I'm hanging on tight to my Crater bag.

Monday, September 21, 2009

rain, rain go away


In light of the recent downpour the Atlanta area has been receiving, I thought it fitting to review my new favourite anorak by Turfer.

I found this beauty on Amazon.com just before a backpacking trip up to Grandfather Mountain and figured I'd give it a shot because, frankly, it is so cheap.

I wanted something that was breathable, budget-conscious, wind and water resistant, and (I'll be honest) a fun colour. I read a few of the reviews and felt it might very well fit the bill; I have not been disappointed.

--> It doesn't have fancy Gore-tex claims to fame, nor did I bother spraying it down with waterproofing stuff. I figure there's a point where you're just gonna be wet if you're in a downpour in the woods, at which point you need to embrace the wet or climb in a shelter. Up to that point, this jacket has done a great job in light drizzle and when I need a layer of protection from the wind. It breathes, too, so I don't end up suffocating in *ahem* perspiration.

--> It is compact, and if you're easily amused like me you'll love that it folds up into itself (the front pocket doubles as a pouch). It is lightweight, and not something I'm going to think twice about shoving into my pack at the last minute. I have a fancy Helly Hansen rain jacket, but I actually prefer this anorak for its compact size/weight.

--> It is cheap. I had a friend who recently needed to ramp up on gear for hiking in the Adirondacks but was dealing with that whole "money is finite, yay budgets" thing. She was pleased with the price and ultimately with its performance on her trip.

There are fancier rain jackets on the market, and better wind jackets I'm sure, but for $20 this will get you covered quickly and lightly.

Be warned, the amazon reviews are correct: it is quite largely sized so you might order on the smaller side.

Friday, September 18, 2009

Oooo, shiny! - Aesthetic Beauty and Functionality

I have decided, that if I were loaded (that’s rich-loaded, not drunk-loaded) I could easily become a gram weenie and let fractions of an ounce hold great power over me in my traipses across backpackerdom.

I have also decided that I’m just not a spork kind of girl. When I want a fork, I want something I can spear things with; when I want a spoon, I don’t want mini-tines poking me in the lip or causing soup to dribble onto my fleece.

My husband once bought me this plastic, all-in-one, knife-fork-spoon contraption, and in my quest to pack more efficiently I tried in vain to like it. But it was not to be. The spoon was both too shallow and too wide for my mouth; I kept slicing the corners of my mouth with the serrated ‘knife’ they slapped onto the outer edges of one of the tines of the fork, seemingly as an afterthought. I don’t care how light it is, or how many pretty colors it comes in - It stays home in a drawer now.

In a moment of splurging during a seasonal sale with a dividend check burning a hole in my pocket (cuz let’s face it, who’s gonna pay twenty bucks for weekend silverware, really?) I treated myself to a set of Brunton My-Ti silverware.

Yeah, yeah. I know it’s kinda pricey if you don’t get it on sale. And there are similar slightly less-expensive products on the market made of aluminum alloy, but I like it. For some reason, to me, silverware is as much about aesthetic beauty as functionality, hence the twelve bazillion patterns of Oneida gracing the shelves of Tarzhay. And with this set, I am in love with its form as well as its function.

I love that it is slightly smaller than similar products on the market and fits nicely into my petite hands. Though the handles are textured, the business-ends of each utensil have been polished to a smooth, stainless-esque finish. Unlike my horrible spork, there are no sharp edges on the fork or spoon with which to unexpectedly injure myself in some tragic mastication accident - yet, the knife's serrations are toothy enough to slice even the stubbornest of camp food.

Coming in at a mere 1.7 ounces (48.2 grams, hehe) Brunton’s My-Ti is built of durable titanium that supposedly, under normal conditions, will not rust or melt (not that I’ve left it in the rain or the campfire to test either claim). The three-piece set stacks and packs nicely and is joined together by a locking miniature carabiner.

I’ve found it both durable and pleasantly lightweight. It’s comfortable in my hands and easy to clean. Depending on what I’ve packed to eat, if I don’t need all three pieces, I’m free to leave those deemed unnecessary at home.

Grade: A+

Friday, September 11, 2009

no priming necessary


I learned to backpack with the WhisperLite International, and while it's generally recognized as a stellar backpacking stove for a variety of reasons...simply put, I hated that thing.

You had to prime it just right, the wind screen was a pain, it liked to clog up, and the whole thing was fairly daunting for a newbie backpacker. I recognize that there are many reasons one would want one of these, but when I went to buy my own stove many years later I looked at other options.

I went with the Primus Classic Trail stove and have been quite pleased. I realize there are other stoves that are lighter, better, or as fast as a jet engine (*cough*)—I still love and recommend my stove for several reasons:

  • It's cheaper than the competition. At roughly $25 it's a veritable bargain. The pocket rocket weighs 5 oz less but is $15 more and is one of the "next cheapest" options. For someone trying to build a kit from zero gear that $15 can make a difference. Or you can jump up to $60 for a 2oz stove but then you're paying more than double and for a beginner that can be tough to swallow.

  • It's so darned easy to use. Seriously, screw it onto the fuel canister, turn the fuel on, light it and go. No priming and no fooling around to figure out how to put it together.

  • It's super stable. You simply screw it onto the top of your fuel canister and you've got a nice platform for your pot, assuming you haven't placed it teeter-tottering on a wonky surface. I usually dig it into the dirt just a little or find a nice flat rock as a platform. Sometimes I have wide pots with me and I've never worried about them tipping off (or worse, setting myself/others on fire as any klutz will tell you is easier than it sounds! :)

  • It has a lot of power if you want it, and has a great way to control the temperature if you don't. We made pizza on the trail last year and were able to turn the temperature way down so that we could avoid burning the bottom in the initial heat-up stage.

I have not used it in extreme conditions (yet), such as extreme cold or extreme wind, but that's not the kind of backpacking we're typically doing in the Southeast on a casual weekend. I love my stove and I'll continue to point folks to it as budget-conscious, easy to use, and reliable.

Thursday, September 10, 2009

Speaking of chocolate fixes...


Many people who are shorter distance runners would not even think of snacking on the run, but longer distance runners know that without the calories you get from your crackers, gel, etc., it is simply not a pleasant experience to try and complete a 12+ mile long run. When your muscles run out of fuel, they weaken, and every stride becomes labored. This is when you need to figure out what you can eat without upsetting your stomach so you can make it through those 20 mile training runs for the upcoming marathon...

There are a few tried and true running snacks I will bring on a marathon training run, such as fruit snacks, Jelly Belly Sport Beans, Clif Shot Blocks, Sharkies and Power Bar gels... A lot of the other running snacks I train with are samples I picked up at races and race expos. I had attempted to eat an Apple Pie Clif Gel on a long run a few weeks ago, and found it to be too heavy and very sticky. I would have given up on Clif Gels, but I am glad I didn't.

I am a big eater, as many people could tell you. I have been known to eat an entire grocery store pizza on the morning of a 14 mile afternoon long run. On my 18 mile marathon training run, I consumed a total of 4 snacks, about 1 per hour on average. I was approaching mile 15 and my last snack of the run, and my muscles were done. Not to mention the pain... (I later remarked to my friends that if a mountain lion had emerged from the woods to chase me at that moment, I would have let it eat me...) I was expecting the last snack to help me stay moving, but I was not expecting the sheer joy I experienced when the Chocolate Clif Shot Gel entered my mouth... It was the flavor and texture of hot fudge! And at about 100 calories of organic ingredients, you really cannot go wrong on this one.

(Side note: Dusty and I discovered on a trek in Argentina last year, when served pastries in a mountain hut with no icing or sauce, that Chocolate Outrage flavored Gu gels serve as an ideal icing for a bare pastry. Based on my experience with the Gu, I would expect that this Clif Gel would also serve as the perfect highlight for your backpacking dessert!)

Gels are my number one energy booster for the final miles of a long run, hands down. The fast energy they deliver is without compare, and they are so easy to eat that you barely have to slow down. Now that I have an option that has the added bonus of tasting like hot fudge, I think I am set!

Grade: A+

Tuesday, September 8, 2009

Man's Best Friend Needs Protective Footwear, Too

My dog and I are definitely cut from the same cloth. She likes to play, and she likes to play hard. If left to her own devices, she’ll run till she’s foamy-mouthed and heaving, barely able to walk. She plays so hard that when we board her at her favorite kennel, where she gets to run amok and rip and snort with a huge pack all day, she comes home and has to sleep it off and tiptoe around gingerly for a few days.

Is it any wonder I love that dog?

Since I have so much trouble with my own feet, I recently bought Sillah her own hiking boots. Ruff Wear advertises their new Grip Trex series as being all-terrain, all weather, and so far, I have to agree. They’re built of a breathable mesh upper and have a grippy Vibram sole that rivals the treads on my own boots. She’s able to barrel through streams in true waterdog style and rock hop back up the bank like nobody’s business. We can hike farther now together, and I no longer have to worry about her picking up shards of glass or thorns between her pads. I can slip them on her whenever we're in the city in a sea of hot pavement, or whenever we visit someone with shiny, easily scratchable hardwood floors. And though we haven't tried out their cold-weather functionality yet, I can see where they're going to make next winter much more pleasant for her.

The first time I put them on her, she did a little get-these-flippin’-things-offa-me dance and tried to remove them herself with her mouth, until I distracted her with a game of fetch with her favorite plushy. But these days, when she sees me break them out of the gear closet, she just does a happy-dance because she knows she’s going with me somewhere cool.

I would not recommend having your dog wear them on the trail right away; take them to the dog park and let them run around for a few days first to see if they’re going to be prone to developing any chafing or hotspots.

Like any new human footwear, they require a break-in period, and you should be careful to buy the correct size to ensure a proper fit. (They have detailed instructions and a sizing chart on their website, but I opted to take my dog to my local outfitter and try them on.)

The boots are held in place with cinch-style Velcro straps, which allows for a great fit, but also can lead to chafing around the ‘ankle’. To combat this issue, the good folks at Ruff Wear have designed liners which reduce the chafing issue around the ankle and also help cushion your dog’s nails so they don't press up against the toe of the boot. (Anyone who’s ever had a black toenail knows how painful that can be!) I highly recommend purchasing the optional liners, and I highly recommend keeping your dog’s nails closely trimmed (whether you ‘boot’ them or not) and also that you stop every little while on the trail and make sure no debris has found its way into the boots. Your dog will thank you!

I do like that the boots and liners are machine washable, and I really like that after a day on a muddy trail, I can slip them off – ta daaa! – before allowing my dog into my vehicle, thereby greatly reducing the amount of mud that makes its way onto my upholstery. I also like that you can purchase replacement boots in singles! (I know a kayaker or two that might wish some human shoe companies would adopt the same policy, hehe.)

It remains to be seen as to how durable those mesh uppers are going to be (I have my doubts) but so far, with the moderate mileage Sillah and I’ve logged, we’re both pretty happy with them.

Grade: B+

Thursday, September 3, 2009

Budget caving for beginners - Headlamps!


Sometimes a hobby becomes a way of life, like when running a couple miles a week turns into training for marathons. Then, you want top of the line gear.

Other times, a hobby is just a hobby. That is how I feel about caving. Don't get me wrong, crawling through dark holes and rolling in mud are wonderful and fill my soul with joy. And, as noted in an earlier post, I would never skimp on my vertical gear, which holds my life in its hands when I dangle, petrified, over a 150' pit. I would also not cave in a bike helmet, similar to my earlier kayaking story. However, when it comes to issues that don't affect my safety and comfort...well, let's just say I am not going to be buying a $100.00 headlamp anytime soon.

For all you novice cavers out there who are not planning to head underground every weekend, there is an easy solution to your gear woes. Walmart and Target both sell LED headlamps in the $10.00-$20.00 range. I have spent a combined total of $25.00 on two of these budget headlamps. For camping I use one, rather than rely on the light of the moon to stumble to the nearest bathroom or hole in the ground, and for caving I use two and carry a hand flashlight as my backup light source.

Another bonus to the cheap headlamp option is batteries. They take AA or AAA, depending which you get, while I had a recent experience where we had to search more than one store in a rural area to find the less common batteries required for a friend's headlamp.

All in all, I have been caving up to 4-5 times a year with one to two (two is recommended) budget headlamps since 2006, and I really can't think of anything bad to say about them. While your local grotto members may all be wearing their $60.00+ Petzl and Black Diamond headlamps with batteries that cannot be purchased at your local gas station on the way to the cave, you will not be catching me in one anytime soon...

Grade: A (note: this is with two. Depending on which lamp you purchase, having only one may limit how far you can see ahead of you, in which case I downgrade to B-).

Note: There are budget versions of the name brands at REI as well, if you want to sport the lifetime guarantee on your headlamp...

Monday, August 31, 2009

sometimes you want to indulge without breaking the bank


A food review seems slightly off topic, but hear me out...

Most of us active types find ourselves consuming quite a few energy bars and gels. Sometimes I make mine, sometimes I get a little more creative with my snacks and go the non-bar route, and sometimes I just want to grab a bar and go.

Then there are the days when I just want (need?) some chocolate.

That's when I'm super thankful of my discovery of the Clif Bar Z-bar in the chocolate brownie flavor. Yeah, they're technically targeted at kids. That generally doesn't stop me, and certainly doesn't here.

With 120 calories, 3 grams of fat, and 12g of sugar they don't break the caloric bank. Compare that to a Snicker's bar which packs 266 calories, 11 grams of fat, and 28 grams of sugar. To compare to something similar, one of the Luna bar chocolate flavors has 180 calories and 6 grams of fat. Plus they're made of organic ingredients, don't have any high fructose corn syrup or hydrogenated oils, and etc. Seriously good stuff!

More importantly, they TASTE good. They satisfy the chocolate craving without being overly sweet, but are sweet enough to pack a chocolate punch. One afternoon I thought I'd push my limits and eat two in a row and it was actually too much!

I might try the other flavors at some point, but for now I'm just going to hoard the good stuff.

Editor's note: They do make an adult-sized chocolate brownie flavor, but it does not taste the same!

Friday, August 28, 2009

not so funny


I used to make fun of convertible pants. They were, to my eyes, unfashionable and downright dorky. "You'll never catch me wearing something like that," I smugly told myself.

Then one day, I rediscovered what I love most (spending as much time as possible in the dirt, or anywhere but inside a formal building). I quickly found my wardrobe shifting from "That is weekday and this is definitely only weekend wear" to "Wow my weekend garb is so comfy (and just as expensive as those fancy jeans!), maybe I can just wear it Mondays and Fridays...you know, Transition Days" to "You mean I have to take them off? But I don't wanna take 'em off until I'm throwing them in the washer!"

I thank the folks at prAna for the abnormally rapid transition.

I bought their convertible pants in an army green and honestly didn't look back. They are, for one, so incredibly durable. I proved this with much butt-sliding on rocks, and a few head-first tumbles, on our Smokies trip. A klutz like me NEEDS durable.

They also zip to a nice "knicker" length, which for me hits just below my knees. I'm not really a fan of shorts unless I have to wear them for practical purposes, so this gives me cool summer ventilation without sacrificing too much on that front. They boast a very flattering fit in the pants or knickers length: a lot harder to achieve than I initially thought! I tried on many, many pairs before deciding these were perfect. If I'm going to wear them that frequently I want them to look good.

And unlike my North Face convertibles the bottom portions actually fit over my boots when I decide I want to take them off in the middle of a hike. (Those North Face do not, so you have to decide pre-boots if you're going long or short. For me, anyway.)

And finally, the cargo pockets are spacious and forgiving. I often cheat on my backpack weight by shoving last-minute items in my pants. I often push the limit of what they can hold, and so far so good with that strategy!

I've given my prAnas some pretty heavy wear and they're holding up beautifully.

Grade: A+++

Thursday, August 27, 2009

How'd I Ever Live Without It?

I stumbled onto the most versatile piece of my first-aid kit quite by accident: It came home with me after surgery. Though I used very little of it for my surgical aftercare, after seeing the wonder the leftovers did for blisters and hotspots, I have a roll of 3M MediPore tape in every first aid kit I own.


3M MediPore tape comes in ten-yard rolls of varying widths. I like the two-inch width because it’s wide enough to wrap completely around the biggest of toes yet narrow enough not to have to spend a lot of time cutting it down to size. It’s perforated for easy tearing every two inches.
It’s porous and stretchy and magically adhesive, even through days of trail grime and boot sweat. Properly applied to a clean, dry skin surface, it will last the duration of an entire full marathon. Best of all, it's somehow achieved perfection in design, in that it's gentle enough to do no harm yet strong enough to stay firmly in place. Plus, it’s easily removable in a warm shower without further damaging injured skin or leaving a nasty sticky residue like duct-tape or those super-expensive advanced healing blister repair pads.

I don’t hike without it. I carry it with me in a Ziploc during long races. Before strenuous treks or runs I use it to pre-tape places where I have a propensity to develop blisters and hotspots – especially toes prone to chafing and toes already without nails.

It’s a sin that it’s not readily available at your local Walgreen’s. Though I’ve had some limited success finding in specialty medical supply stores, and it’s available on the internet for a slightly more exhorbitant price, sometimes I have had to resort to bribing my friends in the medical industry to get me some to replenish the Blister Queen Stockpile. But it’s worth the search and the expense, as it’s saved me on numerous occasions.

I got some big, honkin’ blisters on the first day of a four-day snow trek in the Andes last year that if I hadn’t treated with tincture of benzoin, applied an adhesive foam corn cushion, and then covered it with 3M, I’d have never completed the hike. And let’s not even start talking about what happened to my feet around Mile 20 of the Disney Marathon--Denise and EB'll tell you: It wasn’t pretty.

I don’t know why adventure travelers, marathoners, backcountry medics, and first responders haven’t latched onto the miracle of 3M MediPore tape and made it a household name. 3M is missing a golden niche marketing opportunity, seriously.


Grade: A+^Infinity

Tuesday, August 25, 2009

Don't Be Caught Running On Empty


As Denise mentioned in her previous post, there are two of us currently in training for a full marathon this fall, so I hope you’ll forgive us as we barrage you with the failures and successes of our training.

Speaking of successes, I think I finally got this whole hydration thing down-pat. Or rather, Fuelbelt did, and I’ve latched onto ‘em.

I used to depend solely on the foresight of race officials to anticipate my water needs, but as my distance increased, so did my desire to drink whatever the heck I wanted to, whenever the heck I wanted to, not just at every other mile marker.

So I purchased the Fuelbelt Helium 4. I would like to say I did it after extensive research, but hey, in reality I picked it because it had my one requirement – it had four bottles - and it was blue. (Granted, the constant shifting and chafing of the small Camelbak I was using helped fuel this decision, as did a particular nasty bout of an intestinal bug I seemed to have acquired from a waterstop during the Atlanta Half a couple years back.)

In retrospect, after casing other waists at the starting line, I don’t think I could have done much better. The belt is comfortable; it neither chafes nor bites into my tech apparel, and it stays put. With the exception of a slight stretch, in the couple years I’ve had it, the elastic has so far withstood the test of time, as has the generous amounts of reflective piping around all the edges.

The belt is fitted with a small removable neoprene pocket big enough for a few gels or a spare key, and each bottle slides into a stationary elastic harness, which allows the bottle to bounce a little (reducing annoying slosh) while keeping it securely fastened. However, when I sit down while wearing my belt, say, at the starting line, I have a problem with the two front bottles hitting the tops of my thighs and popping out. I actually lost a bottle this way while making an off-trail pit-stop during an XTERRA. With all the adrenaline, I never noticed it was gone, till I reached down for it in thirst.

There are replacement bottles available if you misplace one, though, or if you unscrew a cap and find it irreparably corroded with mildew because you stored it while it was still damp. Not that I would ever do such a thing! ;-)

Though they aren’t advertised as being so, I’ve found the bottles are top-rack dishwasher safe, which is a big plus given the mildew issue.

Though Fuelbelt advertises its bottles as being ‘leak-free’ I have discovered that if I turn them upside down for longer than a few seconds, they tend to drip, and taking sips on the run is often a sloppy endeavor. Not so bad if you’re drinking SmartWater, but possibly worse if you’re slamming a cherry-red sports beverage while running in a white tank. And yes, I made this discovery before ever dishwashing them.

After using a Fuelbelt, I don’t ever see myself not carrying my own water for anything longer than a 10K. Carrying my own hydration has allowed me to tailor my own hydration needs and keep it consistent from my first training run to my race, whereas before, I was dependent on whoever the race directors partnered with for sponsorship, or whatever was left on the table by the front of the pack. (Not being a front-of-the-pack runner, I have often seen races run out of fuel before the last runners have had the opportunity to partake.)

If I were asked to redesign the Helium 4, I would include a larger pocket, big enough for a cell phone, and maybe a small tube of Bodyglide. And I would incorporate snaps normally seen on triathletes’ race belts, so that I could attach a race number without poking holes in it with safety pins, thus shortening the life of the elastic. (For now, I just wear my race belt underneath, and I’ve added a cell phone case to the belt.)

Four 8 – oz. bottles seems just about perfect for a 20-26 mile run. Despite the thickness of the belt, it’s still somewhat breatheable, and the stretchiness of the belt paired with its Velcro closure ensures I get a solid fit every run.

All in all, a worthwhile investment.

Grade: A-

Sunday, August 23, 2009

simple and effective


We were in Seattle recently and stopped in at a local climbing/mountaineering store to check out what they had to offer. On my way out the door I spied a couple of variations on stretchy headbands, offered by prAna, and decided to snag two: a plain olive green one (much like what you see pictured above, except, you know, olive green) and a reversible one.

I promptly lost the reversible one, because I'm smart like that. However, the green one has barely left my sight since its purchase and I've since added a red one to my collection. (They come in several awesome colors, by the way.)

This headband is made of organic, lightweight, SUPER soft cotton and it is a pleasure to wear. I've had problems in the past with headgear that is either too tight or so loose it does not stay in place. Not so with this band: it stays neatly in place for as long as I want it to.

I already (immediately) knew it is awesome at holding my bangs back when I just don't want to deal with them. I hadn't yet realized how efficiently it catches perspiration until I did a little climbing last week without it and got sunscreen in my eye via a little profuse sweat action. Bleh!

Bonus points, they make a men's version too (in nicely muted colors). You can find them at our local toy store or, better yet, ATLiens can stop by our friends at High Country Outfitters to snag the highly attractive reversible version.

Grade: A+