Monday, October 26, 2009

smart to wear


Reader Chris mentioned this in a post reply, and I thought it important enough to call out in a review. What you see pictured is the Road ID.

It's a pretty simple concept, really: print some basic information on a wristband and wear it when you're out running, cycling, whatever.

My father bought one for me when I was riding a lot, and I've since added it to my running repertoire. There are a few reasons I prefer this over some crap scribbled on a piece of paper and shoved in my pocket:
  • It doubles as a light reflector. You can see for yourself in the testimonials that this simple attribute has saved lives: when a car's lights hit the reflective material, you are more visible than you were when you weren't wearing it. You may have other reflective material on other parts of you, but if that angle doesn't hit quite right you may not be visible enough.
  • It is waterproof and easy to quickly put on. That scribbled note may get wet, you may not feel like writing stuff down, you may even forget to grab your id/insurance card/whatever in your haste to get on the road (if you're like me, anyway). 
  • It is easily visible to paramedics or anyone else who may need to access that information. Admit it, you never think you're going to fall or have issues. You prepare pretty well, but you figure you won't fall on most (or any) of your outings. My father cycles quite a bit, and on one of his solo outings a couple of years ago he fell and blacked out—the folks who saw him fall were able to quickly call my mother and find out who he is without digging in his bag or pockets.
It really, truly is a cost-effective safety measure with several options for style, color, etc. If you don't want to wear it around your wrist, get it for your shoe or wear it dog-tag style. I especially like that it's not married to a particular pair of running shoes or glued to my bike.

I really recommend you nab one of these and make it a permanent part of your fitness/activity wardrobe. It just makes sense.

Friday, October 23, 2009

the quest for perfect trail coffee


After our Java Juice review, Reader Cristy recommended we try the new Starbucks Via (which, coincidentally, came out the same day as the Blech review).

I have to say, it's pretty awesome stuff. I took the in-store taste-test, and could only distinguish it from the in-store "regular" brew (Pike Place) by looking closely at it and figuring instant coffee would look less...smooth (as it's coming from powder)(I was right). I tried the Colombia variety, though there is also a darker Italian Roast variety available.

I thought I'd perform my own home step-by-step comparison to a store brand of Instant Coffee singles (in this case, Kroger) as that is something that would likely end up in our packs for a backpacking trip. You can see the initial packaging side by side at the top of this post.


There are immediately advantages for the Via. I have been carrying that 3-pack around in my purse for weeks now, and have barely noticed it. The post-consumer package waste is also minimized as you are only left with the small "tube" as opposed to the exterior gold plastic wrap in addition to the tea bag-style remnant.

Then there's the taste. As you can see, the color is strikingly different.


I brewed each cup for the recommended amount of time, so I was not "shortchanging" the Kroger coffee. I didn't even have to taste them to know how they'd differ in my mouth, but WOW the difference. If you happen to like the brewed taste of Starbucks coffee, you'll LOVE Via. It's rich, flavourful, and does NOT taste like any other instant coffee I've had. That's even before creamer. Denise had to try it cold last weekend, and gave it a thumbs up as well.

The disadvantage for the Via is that each of those precious tubes is $1 (it's about $3 for the 3-pack), vs. significantly less for the Kroger baggie. And, the "medium" is really pretty dark, so I'd almost hate to see the Italian Roast.

Still, I have to hand it to Starbucks. The Via is definitely a WIN.

Thursday, October 22, 2009

Marathon Morning Checklist - Part Two - For Those Who Travel Light


Contrary to my well-prepared friend, on marathon day, I run light... However, there are still some essential items I would not leave at home...

1. Body Glide... I made the #1 mistake runner's can make on the day of my first marathon - I wore something new... due to a last minute issue with my running shorts, I was left to buy a new pair, and it didn't go well. The chafing on my legs was so terrible I had scars for 3 months, despite stopping at every first aid stand on the entire route for Vaseline. This was the single worst aspect of my first marathon. I now apply Body Glide before any run of 10+ miles, and carry the smallest size they sell, which about 1-1.5" inches in length, for any run of 15+ miles.

2. My Gizmo pirate running socks... Available at every race expo I have ever attended, these socks are specially made for running and also make me feel like a bit of a badass. These socks are moisture-wicking coolmax, though not as technical as Dusty's socks, because I don't have extensive problems with blistering when I run (this has been primarily a hiking-related issue for me)... However, absolutely, under no circumstances do I recommend running any distance over 7 - 10 miles in cotton socks. I did that once and regretted it for a week. My feet were torn to shreds.

3. The sports bra/shelf bra tank combination, both in wicking fabrics. This is less specific in brand, but its benefit is twofold. First off, I need two bras to run 10 feet. Otherwise, it just hurts. I fail to see how any female who is a C cup or higher can run without two bras. Second, the space in between the sports bra and the shelf bra provides a nifty pocket where I can store gels, body glide, keys, Advil and mini camera. My brand recommendation for both bra and tank is Champion C9, which can be purchased at Target. I recommend purchasing them tight for best results, particularly if you have more to hold in...

4. Advil. Advil and more Advil. I carry about 10 of these little orange life-savers in a little plastic baggie for any marathon or long run. I also take 2 before I start. Because long distance running hurts.

5. Snacks! Even if your body does not normally require a refueling every three to four hours, like mine, it will require at least a few snacks during a long run or marathon. While a race course will always provide plenty of water and generally 1-4 snacks, I still carry extra just in case. Jelly Belly Sports Beans, Power Bar Gel, Clif Shot Blocks and Gu are some of my main choices. I will carry one or two on a race (because some are provided), and up to four or five on a long run, depending on the distance. I also bring at least one packet of electrolyte mix which can be added to water if you feel drained or dehydrated.

6. A mini camera. Purchased at CVS for $10.00, my mini digital camera (while the link is the exact camera I have, ignore the price on the link and go to CVS) is small enough to carry in my special "pocket", and I don't care if I break it, because, hey, it's a $10.00 camera... I have carried this camera on two past races and been satisfied with the results. Though the pictures are not of the most amazing quality, they far exceeded my expectations for the price and size of the camera...

I leave my water and Ipod at home for a race (which would never happen on a long run), because I get my energy from crowd support and there are water stands every 1-2 miles in most races.

Basically, first time marathoners, you don't need an arsenal, but it does not hurt to be prepared. Your longer runs will give you an idea of what you need, and you can check the information about what is offered on the course to figure out what you need to carry and what is already provided... Knowing what you need, and making sure you have it, can make that 13.1 or 26.2 feel like a jog in the park... A long, long, long jog in the park...

Tuesday, October 20, 2009

Marathon Morning Checklist, Part One: The Boy Scout

So, um, I’m not a minimalist. Laugh if you must, but in honor of the Marine Corps Marathon, which Denise and I will be rockin’ on Sunday (send us good vibes!) we thought we’d do a sort of comparison of our running styles – and by styles I don’t mean pronation.

Unlike Denise, who will post her own take on this very shortly, after much trial and error, I have adopted the ‘always prepared’ Boy Scout approach: I'm now of the opinion if you even think you might need it, carry it with you. Better to have it and not need it than need it and not have it.* (Monster-blisters on three continents’ll do that to you.)

Without further ado, from head to toe:
  1. Nike Dri-Fit Featherlight cap – It’s lightweight, machine washable with a plastic shape-retaining brim, and the underside of the brim is black, significantly cutting down on glare.
  2. Polarized sunglasses – I like to pretend I need them to shield my eyes from the gnarly windspeed I’m creating, but really it’s just because I’m a vampire who is hyper-sensitive to the glare of the sun.
  3. iPod – I don’t care what the race officials say. That’s right, I’m a rebel.
  4. Garmin Forerunner and chest strap – Never mind that I like knowing how exactly fast I’m running and how fast my heart’s racing, what I really want to know is how many calories I’ve burned, so I know exactly how many I can pile back on at my post-race feast.
  5. Nip Guards and Body Glide on all my chafe-y spots
  6. Fuelbelt – When I’m in my winter gear and I strap this puppy on, I confess, I do sort of feel like a superhero, albeit a superhero weighted down with: 2- 8 oz. bottles of water, 2 - 8 oz. bottles of Accelerade (grapefruit flavor, how I miss you!), a phone for encouraging where-the-hell-are-you texts from my peeps at the finish line, ID/Insurance Card/Keys tucked securely in a zippered pocket, an assortment of gels, and spare socks in a ziploc bag to keep me from sweating on them before I'm ready to
  7. Old school nylon fannypack – Stylish or not, it’s still functional as hell. Just enough space for what I need it for, which includes: Tiny baggies of Advil and electrolyte capsules, 3M MediPore tape, collapsible scissors, sterile lancets for blister-draining on the go, alcohol preps to dry out my sweaty feet before applying adhesive bandages, and blister packs of tincture of benzoin to help said adhesive bandaging stick
  8. Drymax Maximum Protection running socks – slipped on over feet that have been pre-taped and Body Glided in an elaborate blister-prevention ritual that would meet the approval of any practicing Voodoo priestess
  9. GymBoss Vibrating Interval Timer – My newest gadget, with which, judging by my recent successful training runs, I hope to run-walk my way to my best time ever by at least an hour. (Hey, if regular walk-breaks will do that for my time, I will feel no shame!)

    Please join us again very soon when Denise will pose the question, ‘So, D, are you running this marathon, or are you going backpacking?’

    *Rest assured, if it’s on this list, at some point I’ve needed it and not had it.

Thursday, October 15, 2009

So what do you wear UNDER the cute hiking pants???


Deep down, even us outdoorsy women, who rub mud on our cheeks in caves like it's war paint, occasionally want to feel like that delicate sweet ideal girl who never sweats and whose farts smell like roses... It's pretty much not going to happen on a 20 mile long run or an 11 hour hike in the mountains, so we settle for things like the right underwear and socks.

I had been coveting Patagonia boy shorts for months, maybe years, but could not bring myself to spend $25.00 per pair for underwear. Finally, the big Patagonia sale about two months ago lowered the price to $8.00 per pair, about $12.00 per pair with shipping when I bought two. I take it all back, I would pay the $25.00!

What makes these so wonderful as to make them worth so much, you ask? Well, I'm sure you know what the wrong underwear when working out can feel like... Cotton gets wet and stays wet, leading to chafing and just general unpleasantness. Other synthetic fabrics might dry quickly but smell bad. The Patagonia boy shorts are juuuuuust right. The material is soft and comfortable, and it dries quickly, which is useful both during wear and when you are washing them in the sink of an Alpine hut on a six day hiking trip where the drying rooms sometimes work and sometimes do not.

What else makes these wonderful for such a trip, you ask? Well, when you are sharing rooms in bunkhouses with 6 of your closest friends (who hail from both genders), modesty tends to be thrown to the wayside. As someone who generally does not like to let it all hang out in front of others, the level of coverage provided by boy shorts is a big bonus for me in a group setting. Far more territory is covered in boy shorts and a good sports bra than the average bathing suit, so I did not have to squiggle around in my sleeping bag every time I wanted to change my pants!

They have also passed the comfort test on a 20 mile long run. This is no small feat, as there is very little comfort to be found in any run over 15 miles...

And, the final bonus? They look nice! The colors and designs are cute and feminine. This is definitely one case where I say to go ahead and spend the money. Whether backpacking, running a marathon or just lounging around, you can definitely get your $25.00 worth on a pair of these...

Grade: A+

Friday, October 9, 2009

A Miracle Happened!

Last weekend, during the last of my twenty-mile runs in preparation for the Marine Corps Marathon, I ran twenty-one miles—are you ready for this?—blister free! That’s right, people, blister free!

Never before in my life have I run that kind of distance without experiencing some sort of major foot discomfort (i.e., run myself lame) and I credit it to the following things:

First, I was running on nice, even terrain on a cool, fall morning.

Second, I remembered to pre-tape and lubricate my problem spots.

And third, I got new socks.


As our other blister-prone contributor will attest, those who suffer the curse are almost always trying out one new sock or other. Myself, I’ve run the gamut: Wrightsocks, Thorlos, REI brands, etc. None have lived up to their claims, and all have left me feeling fleeced and better off in my el cheapo rotten cotton.

Until now.

Drymax, how I love thee!

On a whim, and in a fit of desperation, I bought a pair of Drymax Maximum Protection Running v4 socks from ZombieRunner.com, a website devoted to all things ultrarunning. I figured if anybody knew anything about running blisters it’d be a bunch of crazy ultrarunners. And it didn't hurt that Runner's World Magazine rated them best blister-prevention sock in a recent poll in its May 2009 issue.

From the first moment I put them on and slipped them into my shoes, I had high hopes for these socks; it felt like I was walking on clouds. They fit slightly snugger than the Thorlos and Wrightsocks I was used to and seemed to be made of a greater percentage of synthetic fibers.

Under close observation, Drymax seems to have taken the best features from Thorlo, Wrightsock, Balega, and other brands and combined them into something undoubtedly more effective. Like Wrightsock, they have moisture-wicking dual layers; like Thorlo, they have extra padding in the footpads. Like Balega, the tops of the socks are a lighter, breatheable mesh.

The padding distinguishes itself from Thorlo, however, in that is coarser and a bit more nubby, with more space between the fibers – which actually seems to work better at wicking moisture away from the feet instead of simply absorbing it.


Usually, I change my socks at mile ten of a twenty-miler, but last Sunday I didn’t. I kept on the Drymax to see how my feet’d fare, and they worked beautifully in conjunction with my taping. I was still smiling at the end of my run, and not limping in the slightest – despite wearing the same shoes that shredded my feet two weeks before.

Really, I wouldn’t change a thing about the socks, except maybe the price. It traumatized me to pay $23.95 for a pair of socks. But given that they live up their claims, I can see myself spending another $23.95 in the very near future, maybe more – especially since they make hiking socks, too. But that’s a whole ‘nother blog.

Grade: A+

Monday, October 5, 2009

Don't spend $20+ on a pack towel. Seriously, just don't.


I have a love-hate relationship with REI. They have everything I will ever need, their sales staff is helpful, courteous and knowledgeable, and they give me all kinds of advantages for being a member, including their dividends, the world's best return policy and member only discounts and sales. Sometimes, though, they just sell overpriced crap. I guess it's the same with many stores, but there are some things I just would not buy at REI.

One example: the camp towel. A friend of mine went to REI a few weeks before a long backpacking trip seeking a camp towel. The cheapest one in store was around $20.00, and the size of a small dish towel. Apparently the micro-fiber is supposed to make this a worthy purchase. It doesn't. He borrowed towels for the entire trip and plans to make the most of the return policy. My other friends are happy with their towels, but still paid $25-30 and greater to purchase them. Not me!

On a whim, while purchasing my cheaper, less essential backpacking gear about 3 years ago, I picked up a Coghlans Camp Towel for $3.00 at Dick's Sporting Goods. This towel is 12 x 30 and the "deluxe" version is 14 x 40 for about $7.00-8.00.

I have used this (extremely lightweight) towel for 3 years, and it is no worse for the wear despite its price implying that it might be somewhat disposible. Its claim that it absorbs ten times its weight in water is completely believable to me (though I have not engaged in any testing that would prove this with scientific certainty). I never would have believed, based on its size, that it would be enough towel to dry my body and hair after a shower, until I was in the situation where it was the only thing I had. While you can't wrap this towel around your body or long hair, it will dry you thoroughly. An added, and very important bonus, is that the towel itself dries significantly faster than the $30.00 microfiber towels my friends were sporting on the same trip. Yessir, mine dried, theirs didn't. $3.00. Take that, expensive outdoor gear sellers!

Grade: A-, for lack of modesty. I am guessing a larger sized version would be A+.

Friday, October 2, 2009

Guest Review: My First Vertical Gear

As noted before, we will occasionally feature guest reviews by trusted friends and colleagues. Today's review comes from Cristy F.: architect, AOC member, and outdoorswoman extraordinaire.


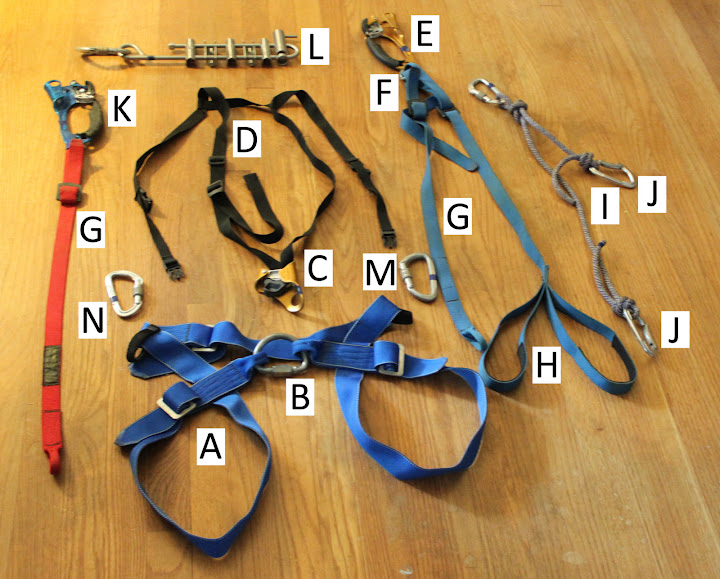
Vertical Caving Essentials: Seat harness (A), 1/2 Moon Galvanized Carabiner (B), Croll (C), Chest Harness (D), Left Ascender (E), 7mm Oval Carabiner (F), 2 Safety Straps (G), Foot Loop (H), Double Cowstail (I), 2 Non-locking carabiners (J), Right Ascender (K), Stainless Steel 5 bar with Hyper Bar Rappel Rack (L), Screwgate Carabiners (M,N), Gloves (not pictured) and Webbing (not pictured).

Vertical caving is a specialized sport that should not be embarked upon without proper training and guidance. Please keep that in mind before dashing across the internet for awesome gear, and seek professional help before going vertical.

Vertical Gear. Once you decide to buy it, you can't wait to get on rope. However, every caver has a different opinion on what style of gear to choose, where to buy it, and once you get it, how to assemble it.

I decided to go with the "Frogging" style of gear. Frogging gear is best for shorter, beginner climbs, and in general for climbs that are gnarly and dirty (the way I like them). It also gives the beginner a chance to get used to being on rope with a system that is simple to safety check.

I am happy with my gear. I purchased everything from Gonzo Guano Gear and I feel I got the best combination of value for money. You can also purchase very reliable gear from the nice people at Inner Mountain Outfitters, and if you're in the Atlanta area or meet up with them at the Cave-In you'll have the added advantage of trying everything on before you buy it.

Much of the gear is standard component and falls in the category of "If It's Safe, It's Good". I should have purchased additional 7mm Oval Carabiners for all my strap to ascender connections. Opinions mainly vary on four items: the chest harness (go for the H type), the foot loops (with the double you can use both one foot or two), the seat harness, and the rappel rack.

I purchased the Gonzo Guano Gear (GGG) Caver Seat Harness and have sat in it for a few trips. It is not a maserati harness! It is the simplest harness you can buy assembled and ready to go. I have learned to have clothing between my upper waist and my harness to avoid little rub/cuts on the sides of my stomach. Smaller people have problems with the leg loops falling down. Men have issues with the leg loops and what is between their legs. At this point I am not a pit bouncer, spending all day on rope. I like to drop the pit and explore the cave so the slightly lower comfort level is not a problem. If I start spending days at a time on rope I will spring for a cushier harness, but at this point I am happy with my simple, cost effective, safe harness (B- on this one).

On the other hand, the SMC Stainless Steel 5 bar rack with BMS Hyper Bar is one of my favorite pieces of gear. It looks rather odd and is all metal and clanky so you feel like you are about to do something fun when you pick it up. Whenever it is attached to my harness I know an adrenaline rush is on its way, and I know that my life depends on it. Many people recommended mini-racks and others asked why I wanted 5 bars and a hyperbar. This rappel rack is special. It is a solid piece of safety equipment; I can lock myself off so completely that nothing could budge me, which makes me happy. Since it is friction-friendly stainless steel and not aluminum it is an appropriate rack for the long rope drops of the future while still being perfectly acceptable for short ones. People might laugh at you, but insist upon it, 5 bars AND a hyperbar, in Stainless Steel. Some assembly is required (A++).

Overall I give the whole gear package an A!

Thursday, October 1, 2009

The hiking sock experiment...

My previous blogs have given you some idea of my past blister experiences, if you are a regular reader. If not, read me. An unfortunate fact about my favorite socks is that they no longer make them in my size. What's a girl to do?

I got my perfect setting for a hiking sock experiment in what was also a potential blister disaster: a 6 day hiking trip in the German and Austrian Alps, where our typical hiking day ranged from 6 to 11 hours and the terrain was...well, Alps! There were some feet on that trip that were not for the faint of heart, but not mine, thanks to the strict regimen of very tight socks and slightly tight boots I have followed ever since my nightmarish experience on Cumberland Island in 2008, where every step I took was like walking on razorblades.

A week before the trip I went to the mothership to purchase my socks (a lot of the smaller stores we shop at don't carry children's sizes, which is pretty much where you have to go if you want to wear tight socks on a size 6.5-7.0 woman's foot - I typically go with a children's medium, but I suggest trying them on). I bought three different socks to test in addition to those I already own and like, all of which have corresponding socks in the adult section for those with bigger feet. Two of the three get a thumbs up, I am happy to report!

For days 1 and 2, I went with the Wigwam Hiking/Outdoor Pro Socks. The cost is $9.50 per pair for kids, $12.00 for adults. We hiked for about 5 hours the first day, very much of which was uphill, and 6-7 hours the second day. Both days I did not experience a lot of wetness in my socks, and, more importantly, both days I went completely blister-free! Grade: A.

For day 4, the "long" day (which it certainly was), I went with Smart Wool Hiking Socks, as they are the most expensive which in some circles means the best. These socks are $10.95 for kids, and cost a good bit more in the adult version - $17.95. They stood up to the blister test, I must admit, which is impressive for the length and difficulty of the hike on this day. We even hiked in the rain for two hours, adding an extra degree of challenge. However, though I did not experience significant foot wetness (prior to the rain), it was more than the Wigwams. A- (docking points for price)

On day 6, the easiest day of the trip, I wore my REI Merino Wool Hiking Socks. At $8.00 a pair for kids and $12.50 for adults, it is a more economical option than some brands, and they were also on sale that day. I decided to buy one pair and give them one last chance, cautiously, and only picking the thickest pair in the bunch. I have learned from this experience that I still hate REI socks. I wear them at camp but I will not hike in them. I may have been on the trail 20 minutes before my feet felt wet from sweat. I had a tiny blister on my toe at the end of this day. C-

The winner: Wigwam! While these socks were not substantially better than the SmartWool, they were substantially cheaper, particularly in the adult version, where the markup is astounding on the SmartWool. Truthfully, I would buy either on sale. The real lesson to be learned is one I have repeated over time, which is not to go "store brand" on the socks. They are just too important to your comfort as a hiker.